
Lens: Voigtlander color-skopar 35mm f2.5
Camera: NEX-7, ISO1600, f2.8, 1/30, raw
This project gathered in these months quite a few followers, and I wish to thank you all for your daily presence in the blog, in the forums, in the facebook page (for those among you who liked the page), in the flickr photostream, and in whatever else I am using to share the project.
One of you yesterday asked if I could share some tips on how to “frame and isolate subjects with darkness… making the subjects really pop out and demanding that the viewer take notice. I’m curious as to how you do that and make the transition from the complete blackness to the subject so smooth. Also, any tricks for getting such detailed and crisp shots in such low light situations?”.
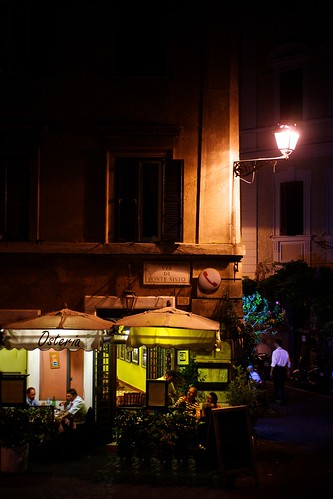
Among my photographs, night shots are those in which the post production plays a minor role, since the proper exposition at the time of shooting is crucial. This is why I will talk only about how I shoot nocturnals, and not about the post-production, this time.
First of all I adjust the white balance. I know this can be done afterwards (I shoot raw files, ever and only), but since I compose for colors other than shapes, I want the picture I’m looking at to resemble as close as possible the one I’ll get after postproduction.
Then I expose for the lights. With night shots this means under-exposing (a lot). I shoot wide open, so either I’m in Manual mode or in Aperture priority, I have to reduce the shutter speed in the first case or the exposure in the latter.
When framing, I want the darkness to embrace the subject, so I need to be far enough from it to happen. This also means that if the subject doesn’t get surrounded by enough darkness, for example if the area is overall well lit, then it isn’t a good subject for this kind of photography.
If the shutter speed gets so low that I can’t get sharp shots, I set the camera on Continuous Shooting, stay still, and shoot between three and five shots. The first and the last ones will always be blurred, but chances are good that one of the shots in between will be perfectly sharp. To stay still, I use some “sniper techniques”, pressing elbows against my body, breathing out, closing the epiglottis, and focusing on my stillness.
Regarding the crispness of the shots, well, it really depends on the lens. I don’t want to use tripods (can you imagine a 365 project with a tripod always along?), and I like my NEX-7 raw files till 1600 ISO, so I need to shoot wide open (f2.8 at least). Only few lenses can provide rich details and tones at that aperture, and among those the voigtlander color-skopar 35mm f2.5 may be the cheapest (and it’s also lightweight and pancake sized).
How did you like the lesson?
A great insight and useful lesson – thanks, Luca!
I do have similar settings available on the NEX-C3, but I know with the extra dials available on an NEX-7 (or 6…) that I will have a much fuller set of controls.
I've learnt the very basics of photography with my C3, and I feel ready to take the next step. Last night, I took a photo somewhat inspired by your excellent night shots. (If you're interested, it's here http://www.flickr.com/photos/martindesu/7943426968/ )
Valuable tips here. Pre-production is much more important than post-production, in my humble opinion.
Hi Martin, I'm glad you liked the post 🙂
It's true that the extra dials on the nex-7 make tweaking a shot more quick and effective, you'll surely love them!
About your shot, it's excellent, perfectly exposed and nicely framed. Good job!